Tuesday, October 28, 2014

Bloggers' Quilt Festival Entry

I've said in the past I wanted no part of entering quilts into contests to be judged, but here I am. The judging I had in mind at the time was the kind done at fairs and quilt shows, where technique and quality is critiqued to the N-th degree. No thanks. I enjoy sharing my quilts, however, so I'll most likely change my mind about that. We'll see.

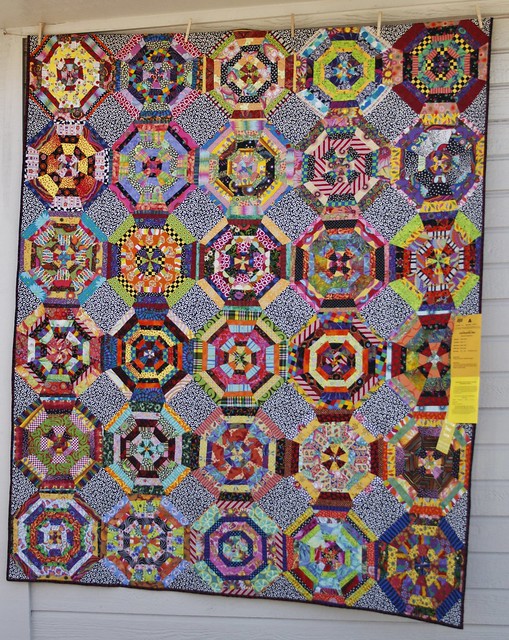
I've been participating in the Amy's Creative Side Bloggers' Quilt Festival as a spectator and voter for a couple years now, and I really enjoy looking at everyone else's quilts and reading their quilt stories, so I decided to finally enter one of my own. My mom's Batik Twister Quilt is my entry for large quilt. It measures 110 x 124 -- the largest quilt I've made in the four years I've been quilting. When I started this quilt in 2011, it was meant to be a bedspread to go on a full-size bed in a room with blue carpet. She specifically wanted a bedspread, and I thought a full-size bedspread was doable. Then Mom got a bigger bed and new carpet, and it stalled for a while. I finally finished it in the fall of 2013.

Beyond the center twister-patterned center, I used no pattern. It didn't take me long to realize that maybe this wasn't the best project for a beginning quilter, but I wasn't about to abandon it.

(Photos taken at Gold Bluffs Beach in Northern California.)


For the back I used all my failed ideas from the front and basically made it reversible.


I enlisted my brother and my nephew to be quilt holders.


I took special care to make sure the top design elements on the front and back lined up with the top of the pillows when the bed was made.


Thanks for visiting my blog and reading my quilt story. I'm looking forward to browsing everyone else's quilts again this year. If you're not familiar with this virtual quilt festival and love to look at quilts, follow the link below and be prepared to be amazed. Voting starts on November 1. There are some beautiful quilts out there! 


AmysCreativeSide.com


Saturday, October 26, 2013

Red Hot Applesauce

I spent last weekend in Eastern Oregon for a work thing. The beautiful drive, blue skies, and the opportunity to connect with friends was just what I needed. On the way home my friend Stacy and I were talking (we actually never STOPPED talking), and the subject of food came up -– what kind of food we grew up with, what we like now, what our spouses like (and don’t like), etc. The subject of canning came up, and she shared with me that her mom used to make Red Hot Applesauce. Red Hot --- what? I had to try it. A few days later the “recipe” was in my in box. (Thank you Elva!) So here we go…

Peel, core, and chop or slice some apples. I sliced them somewhat thick, then cut the slices into thirds. I was using Gala apples, and I had no idea how much they would break down in the cooking process.

I ended up with about eight cups of apples from the seven apples I used. Elva suggested cutting them into a bowl with a splash of vinegar to prevent them from browning, but I wasn’t making the gallon that her recipe described and I knew it wouldn’t take me that long to do it, so I skipped that step.

My eight cups of apple chunks went directly into a big pot with a cup of sugar and some water, about one-third of the depth of the apples, over a low to medium flame.


I mixed that up, then came the fun part – 1/3 cup of Red Hots (well, these were generic, so technically they’re cinnamon candies).

Keep stirring. You don’t want them to clump up.

At that point turn the heat to low and keep cooking your apples until they’re cooked to your satisfaction. I like some chunks in my applesauce. I think it took a couple hours to get to this point.

Done! And really good. Thanks again for sharing, Elva!

Wednesday, August 7, 2013

WIP Wednesday

As a way to get more involved with my awesome Portland Modern Quilt Guild, I’m going to occasionally take part in WIP Wednesdays. I consider myself one of the slowest sewists ever, so there won’t be too many of these. When I have something to post, though, I’ll play along.

This week’s WIP is a scrappy bunting, or banner, or whatever you’d like to call it. My first experience with fabric bunting came when I volunteered to make some for a wedding. I wanted to make a LOT (I ended up with 14 eight-foot lengths), so to save time I just straight-stitched two triangles together – no hidden seams or anything like that. 


More recently I decided to spruce up my front/back entryways with some batik bunting. With the sun shining through them, they remind me of stained glass.

  
 Back to my WIP. I recently discovered the quilts of Freddy Moran and Gwen Marston, and I got lucky and got a firsthand look at one of them at this year's Sisters Quilt Show. I’m really drawn to all the bright colors mixed with black and white.
 

Quilt by Freddy Moran and Gwen Marston
 
 
Quilt by Freddy Moran and Gwen Marston
 

That was the inspiration behind the color theme of this project.


The contrast between the letters and the background just wasn’t there, though, so I started over.


Much better. It will spell the word “Celebrate” so that it can be used for more than just birthdays. (Plus I don’t know that my attention span could hold out long enough for all the letters in “Happy Birthday.”) I may use the black and white fabric I’ve been stashing on the back of each block, just to get it out of my system until I have time for a quilt.


Friday, June 7, 2013

Just In Case

Just in case I ever decide to get back into this, I'm saving a spot on Bloglovin'.

Follow my blog with Bloglovin

Monday, February 4, 2013

My Sewing History


Obviously I haven’t been baking much. It’s all about sewing these days, and that doesn’t lend itself well (for me, anyway), to stopping much for photographs. In an effort to try this blogging thing again, I’ve decided to participate in something called Sew Thinky Thursdays, put on by Emily at Mommy’s Nap Time.  She poses a question for the sewing/blogging world, and those interested answer the question in an effort to get to know each other better. I’ll start with that, and then see if something clicks and I can find something to talk about on my own in the weeks ahead.

The first questions Emily posed:

When did you start sewing? Tell us a bit about your sewing history. When did you realize you were really hooked? 

I didn’t start sewing until I was 43.  I did a lot of cross stitch and needlework, various crafts (stained glass mosaic, paper crafts, photography, to name a few), but never sewing. My mom sewed when I was a kid. In fact, she made all my clothes until about third grade. I hated going to the fabric store with her – I had no ability to imagine the clothes in any fabric other than was pictured on those paper envelopes, and it felt like we’d spend hours and hours in the fabric store. BOR-ING.

In high school, when everyone else was taking home ec, I wanted NO part of it. I took typing and other business-related classes (but for the life of me I can’t remember any of them but typing). Somewhere around 2005, my mother-in-law gave me a sewing machine. How nice was that?! But nothing inspired me enough to even take it out of the box.

Fast forward to 2010. I was living in northern Washington state. It was dark and cold, I didn’t have a social life, my creative juices were stagnating, and I got invited to a baby shower. I decided I wanted to make a quilt. No idea where that came from, but I was determined. Since I had just about three weeks, I decided on a rag quilt. I got a lot of help from some friends online and a few YouTube tutorials, and I made this:


I was hooked. HOOKED.  We eventually moved back to Portland, but not for another two years. Sewing pulled me through those dark, lonely days. And it keeps pulling me through my days – I work long hours from home, I can’t get out of the house much, and I don’t know what I’d do without sewing to keep me going. Reading some of the other bloggers that have been participating in this link-up exercise, apparently I'm not the only one that finds sewing a form of therapy.

Wednesday, April 4, 2012

Nesting

We're decorating our rental. The landlord offered to paint before we moved in, but I need COLOR and I want to pick it out myself, so we made an agreement that he would pay for the paint if we did all the actual painting. So we started with these area rugs.


Pretty wild, right? But after living in a staged house for the last year, we were ready for something more "us." (That's Maude sneaking under the table.) Then I found this set of curtains at Goodwill. 96" (Ikea) curtains, $7. I wasn't sure what I was going to do with them, but I figured for $7 they'd make a great addition to my slowly growing fabric stash.


I ended up deciding to put them in the kitchen. One thing led to another, and the kitchen ended up lime green. The dark brown is going on the metal interior garage door and will be mixed with unsanded grout to make a magnetic chalkboard. The lighter brown is on two walls in the living room, and the cream is everywhere else.

I sorted through my fabric and found several scraps that would make up a nice table topper or wall hanging.


I sketched a few possibilities, but I have sooooo many projects in my head that need to get out, not to mention the few that are already started, I realized I didn't have time overthink it. Inspired by the theme of "improvisation" at last month's Portland Modern Quilt Guild meeting, I decided to just DO IT. I gave myself 60 minutes to see how far I could get without measuring or planning ahead. The idea was to just keep going. This is the result of one hour.


After two hours and some seam ripping, I declared it finished.


It measures 17"x18", so I'll probably add another inch to square it up and use it as a table topper. I've still got all those other fabrics to use -- napkins, pot holders, or...? --- plus the majority of the Goodwill fabric -- I only used the top 18" of one panel for this valance. I still need to hem it a couple inches and shorten the width, but I love it.


I'm pretty satisfied with my little improv experiment. I've got an almost-finished mini-quilt, something that never would have happened if I'd designed it to death.

On to the next project!

Friday, March 23, 2012

Happy Birthday, Oreo!

My first crack at baking since we moved from Bellingham to Portland about two weeks ago. I had to work downtown for about a week, and on one of my breaks I wandered over to Sur La Table. (Poor me, right?) I'd already planned on making the cupcakes -- but I wanted a coordinating liner, and I knew I'd be able to find something there.

Five days later I walked into The Decorette Shop and found an entire WALL of cupcake liners.

Since I'd already gotten some nice ones at Sur La Table, I just rejoiced in the fact that this supply is only eight wonderful, walkable blocks from my new home.

The first step was separating 26 cookies. I twisted a few, but Oreos aren't in my Top 5 Cookies list, and I didn't have the finesse necessary to prevent a cracked top. So I got out the paring knife for the rest of them. Broke a few tops in two, but kept all the pieces, figuring I'd handle them carefully and piece them back together, or just get lazy and stick shards of them in the top of the icing.

I quartered 20 more cookies and folded them into the batter.

I wanted a more uniform frosting application, so I had to dig around in the garage for one of the several "CAKE STUFF" boxes. As I was contemplating piecing the Oreo tops to make wholes, or just going the lazy, shard route, Eric walked by, saw all the pieces all over, and said "Ooooh, a puzzle!" Bonus.

I piped pretty cream cheese frosting rosettes on them (only to smash them with the oreo tops), and sent them on their way.

The box I got at The Decorette Shop was a tad too small for the 26 I made, so darn, I had to keep six.


I have Pinterest to thank for the desire to make these. The recipe is here.

Oh yeah -- I did in fact buy a box of Birthday Cake Oreos. I love cake, we know that. I'm not a huge fan of Oreos, we've established that too. They were okay. I used about 10 of them in this recipe because the bag of Double-Stuff Oreos had only 20. I don't think they affected the taste of the cupcakes that much, but on their own, they were just mediocre. A little too artificial tasting for me. I found a more detailed review here, if you're curious.

Sunday, January 1, 2012

My New Therapy

My baking posts have become almost nonexistent. I still bake birthday cakes for faraway friends, but I've discovered quilting and haven't looked back. A lot more expensive than baking, but a much more satisfying creative outlet for me. Maybe my blog needs a name change?

Quilts of 2011

Monday, December 5, 2011

Crock Pot Granola

One of my default desserts is Greek yogurt with granola, sometimes with fruit. We're both reading labels more and more lately, and since it's next to impossible to find granola in the grocery store without sugar, I decided to make my own. In the past I've made it the traditional way, on cookie sheets in the oven, but inevitably I always burned it. Then I stumbled upon this blog post about making it in the crock pot, so I tried again. Success!

2 1/2 cups oats
2 1/2 cups seven-grain mix
1/4 c. coconut
1/4 c. dried apricots
1/4 c. chopped almonds
1/4 c. raw sunflower seeds
1/4 c. raw pumpkin seeds
a few scoops of ground flax seeds


Add 1/4 c. melted butter (or nut butter -- I'll try almond butter next) and 1/4 c. honey and stir.


Add to your crockpot and vent with a chopstick (or a wooden spoon or something). Be sure to stir every half hour or so -- definitely if you can smell it, you should stir it.

The original recipe says to cook it for three hours, but I've found even two hours can burn it. This time I cooked it for two hours and left it in the hot crock pot, turned off for another hour, and I still got some burned bits.

Edit: I forgot to mention, the granola won't seem "done" -- it will still be kind of chewy while it's warm. It will crisp up after it cools. The first time I made this I cooked it way too long because it seemed as if it wasn't cooking. Also, if you want it to clump more, you'll need more honey than the 1/4 c. stated in the recipe. Play with it!


Next time I'll cook it for two hours and take it out immediately to cool.

What I like about this recipe is that it's so easy to change. Just take a walk through the bulk aisle and grab what sounds good.